SuperDave's Aoshima Interceptor
Here is SuperDave's awesome Aoshima Interceptor. As you can see, he put an incredible amount of work into the minor details
or the car and with the weathering; even going as far as to make from scratch the interior door panels and frames AND
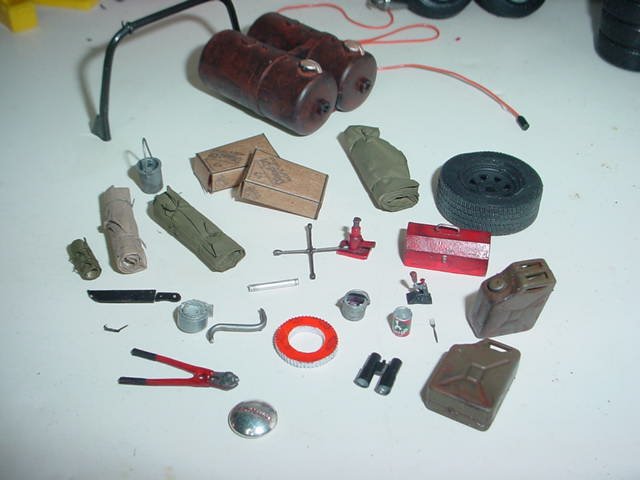
including EVERY SINGLE tool and piece of equipment that Max carried. I haven't seen an Interceptor this well made in quite
a long time, if ever! The pictures will speak for themselves. Top notch work, SuperDave.
Here is what SuperDave had to say about his Interceptor:
Building the ôRoad Warriorö Interceptor
By:
David R. Hausler
It is a lawless, post-war land. Max roams the countryside in his former Main Force Patrol unit, constantly on the move, in search of water, food, and gasoline in a fuel-ravaged world, accompanied only by his faithful dog. His car is ôthe last of the V8 Interceptorsö.
In reality, the car was a 1973 XB GT Ford Falcon, modified with a custom accessory nose piece popular at the time. A blower was added to the hood to give this car a different, but mean look.
The ôMad Maxö movie series was a success. In the first movie of the same name, Maxĺs car was a shiny black machine, sleek and menacing. Now, it is a tool of survival for Max, converted to haul large amounts of precious fuel. Itĺs well-used and dirty, but still powerful, as evidenced by his skirmish in the opening moments of the second movie, ôThe Road Warriorö.
The car has changed between the two movies. Some parts have been stripped, but Max has added two large fuel tanks, which take up the space where the trunk was originally. Iĺve been wanting to build a model of this car for a long time. It has so many of the elements that I enjoy: Itĺs a movie car, something I have a penchant for. Itĺs certainly different, being an Australian car. It also gives me another opportunity to add a lot of interior detail: STUFF! I like stuff! Lastly, itĺs also another chance to heavily weather a car, something I havenĺt done in a long time!
Last year while walking the aisle of a hobby center, I found this model by Aoshima. Naturally, I plunked down some green and left that day with a new project!
Upon arriving home, I opened it up and discovered that it was a curbside model. Still, my enthusiasm was undiminished, and, armed with copies of the first two movies, I set out to recreate the Interceptor.
The first thing I did was review the movies and jot down details of what I wanted to replicate in my model. The internet was also useful, with such websites as madmaxmovies.com and lastinterceptor.com. A couple of fellow model car builders also provided me with information. A fellow by the name of Dave Carnevale, known as ôVW Daveö on the Hobby Heaven Message Board, was especially helpful in supplying me with photos of a replica Interceptor, and of course, lots of encouragement!
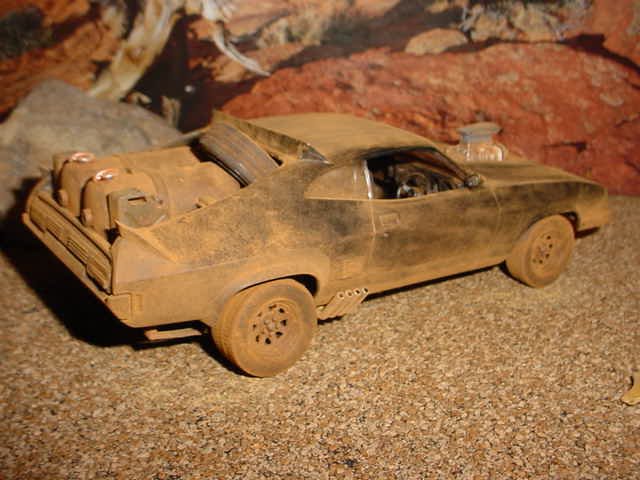
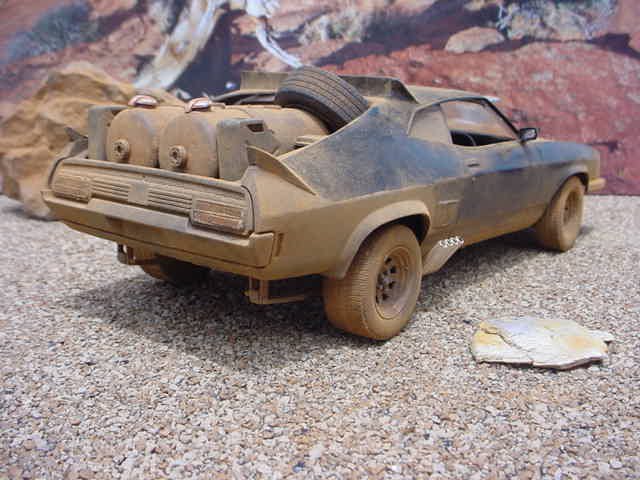
In ôMad Maxö, the car is a shiny black with flat black accents on the hood, rear fenders, and rear panel. By the time ôRoad Warriorö takes place, the carĺs paint has dulled considerably. I liked the flat black accents of the first car, but also wanted (naturally) to get the car as dirty as I could. I decided that my model would represent the car at some point in time between the two movies.
I painted the body with Tamiya TS-29 Semi Gloss Black. Once the paint had cured for several days, I taped off the appropriate areas and sprayed it with some Testors Flat Black. The result is the menacing black on black of the first movie car. Too bad that the dirt would eventually cover up so much of it!
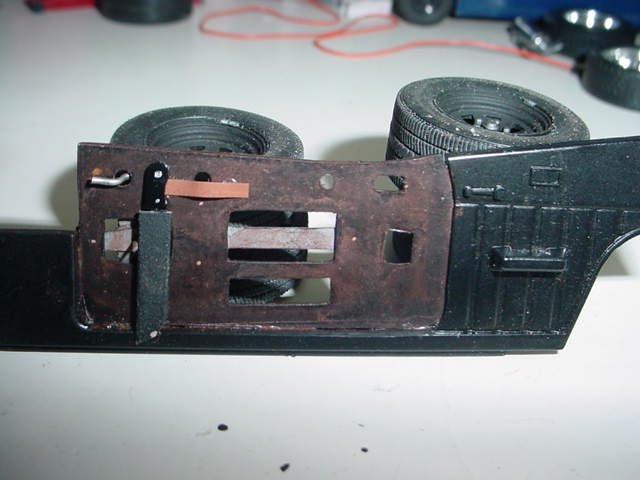
I tackled the chassis next. Although Aoshima has given us only a curbside kit, the chassis is still very nice. Engraving is nice, and even includes the lower part of the engine. In fact, the only drawback I could see was the plastic in the ôopen spacesö between the engine and the frame. I decided that it had to go, so I got out a heated cutting tool and cut out as much of these ôspacesö as I could, then removed the remainder with my trusty grinding tool. What resulted was an actual open space that will trick the eye into thinking there is more there than there actually is. Itĺs a visual effect, but an effective one, I think.
The ride of the car in back needs to be raised just a bit, as it sits too low. I solved the problem by scratch building shackles, which were on the movie car anyway.
One final bit of creative license I added was some rust holes at the rear of the chassis, under the trunk area. Since the car has no trunk lid, I figure that rain water would accumulate in this area, and rust would be a natural occurrence. So I drilled some small holes with a pin vice, then took my motor tool and ground away the plastic from the back side of the chassis, until larger irregular holes appeared.
The chassis was painted with Rustoleum Red Oxide primer, which gives the underside a nice, overall rusty effect. I then gave it a couple of ôspritzesö of flat black, holding the can back quite a bit further, so as to give it a light dusting.
Now I was able to move on to painting the rest. The suspension was painted black, while the gas tank, leaf springs, and driveshaft were painted steel. The engine block was painted Ford Engine Blue, the oil pan black, the transmission steel, and Model Masters ôTitaniumö for the headers. The fan belts were painted flat black.
I used ôThe Detailerö to give the mechanical parts a wash of black. What results is a greasy, grimy look for the engine and rear axle.
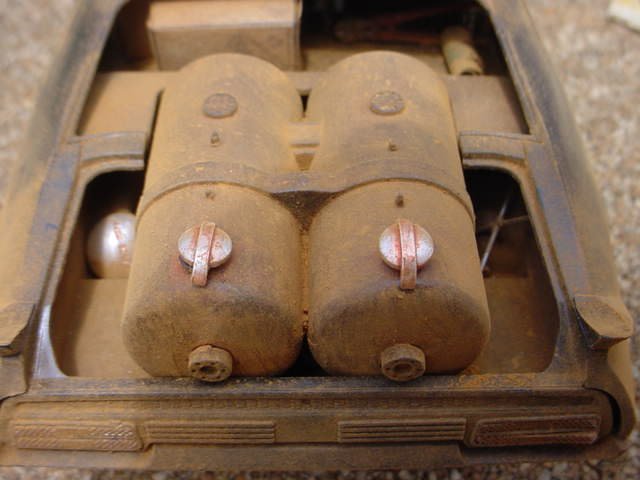
I also used the ôRustallö system on the chassis. Rustall is a four-part set of a rust-colored wash, a black colored wash, a clear flat, and dirt. I used just the rust and black washes for this. The rust wash was applied to the metallic parts, and gives a nice look of surface rust to the pieces. Then the black wash was applied
Aoshima includes the bomb that Max installed to booby-trap the car in case anyone tried to tamper with his gasoline tanks. It is very accurate to the movie part. The only modification I made to it was grinding off a molded-in wire and replacing that with a small wire from the parts box. After detail painting, it was installed in place behind the left rear wheel well.
In ôThe Road Warriorö, we see Max keeps a knife near the bomb. I scratch built mine from thin sheet plastic, painted it, and mounted it in the appropriate location under the car.
The wheels were painted flat black, then detailed with wheel weights made from white glue, and painted steel. The hubs and lug nuts were also painted steel. A spare was included, and I modified it before painting by drilling out the lug nuts and hub. It was also detailed with the weights. The tires were sanded, then mounted to the wheels. The inner wheels were painted steel, given a wash of Rustall, and installed into the wheel assemblies.
I attached the shock absorbers and front suspension, but left off the rear suspension and exhaust pipes until final assembly.
Now was the part of the build that I was to really enjoy - the interior! This was going to be my opportunity to add a lot of detail. But first, I had to make a few modifications.
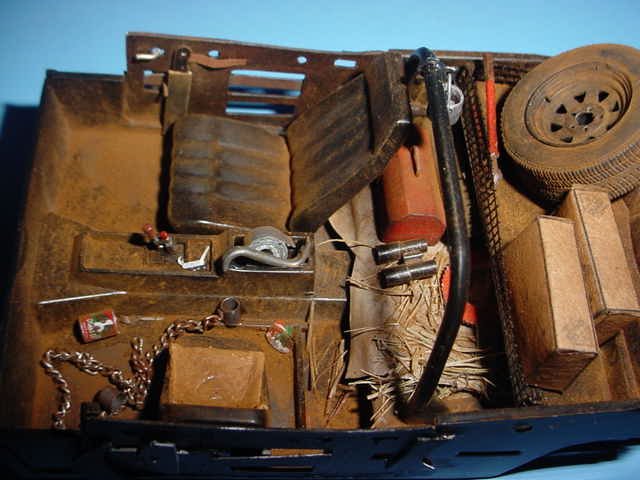
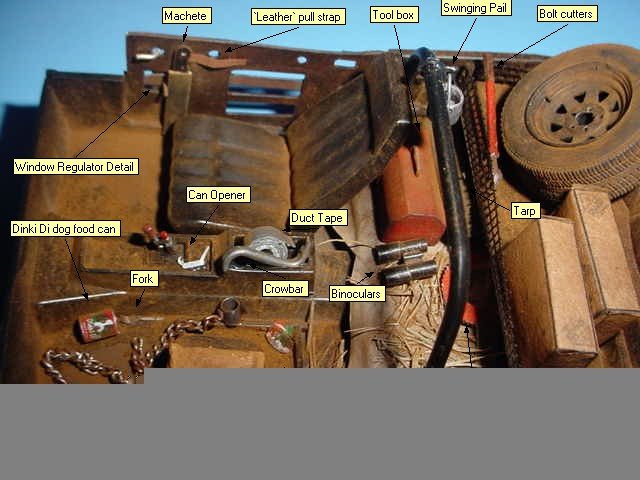
Aoshima furnishes a minimum of interior parts. Most are nice, but one is not. The area behind the driverĺs seat is very weak. There is a piece which covers the rear seat cushion that is supposed to represent a storage area behind Max. Things which appear to be boxes and cans are molded in place. Nice thought, but it just would not do. I cut the rearmost part of this piece off, and discarded the rest. A shelf made of flat sheet plastic was attached to the part I retained. This was further detailed with a couple of uprights at each leading corner. A narrow strip of nylon screen wire was attached with superglue to resemble the mesh found on the movie car.
The rear seat cushion is molded in place. I removed it with a razor saw, and installed in itĺs place another shelf made from sheet plastic. Now I had two shelves, which is correct for the car driven in ôThe Road Warriorö.
The rear area where the fuel tanks would locate was painted flat black. Then it was given a liberal treatment of Rustall. I figure that this area would catch all the rain, since the deck lid has been removed to install the tanks, and water would collect in this area. Iĺve also found that the flat black paint works better with the Rustall.
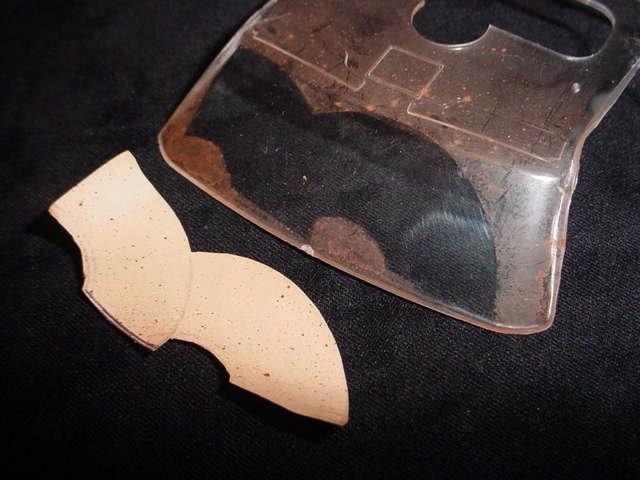
The next modification was the door panels. Aoshima has stock door panels included, but in the movie the skins have been removed, exposing the metal ôskeletonö underneath.
I cut out the interior skins, then replaced them with new ones made from sheet plastic. Rectangular holes were cut in the new skins to simulate the 1:1 parts. I made sketches based on the movie, as well as show cars of the Interceptor in itĺs Road Warrior configuration. I donĺt know how accurate they are, to be honest. But they look convincing. They were painted with Semi Gloss Black.
It was at this time that I realized that a good friend can give you not only encouragement, but inspiration. My friend and fellow member of the internet modeling group ModelCarsUnlimited, Chris Soefje, did just that. After I showed him a photo of the new door panels, he suggested that I add regulator detail. I arose to the challenge, and set about recreating the parts I needed. I googled regulators for a Ĺ71 Torino at an online auction site, made a couple sketches, and made what I needed from sheet plastic. It actually took me longer to find the pictures than it did to cut out what I needed. They are made in three pieces, cut to shape. A file was used to make the teeth in one part of the mechanism, and a hole was drilled to accept a short section of wire for the window crank shaft. After gluing them together with super glue, they were painted with a steel color, then installed in place. In actuality, most of the detail is unfortunately barely visible, but I know itĺs there, and am proud of the work I put into it.
The door panels were given a wash with the Rustall. Once dry, a leather pull strap cut from paper and painted the appropriate color, was installed in place. The door handle was made from a short length of solder glued in place. A machete was also carved from plastic and mounted to the door, close at hand in case Max needs it.
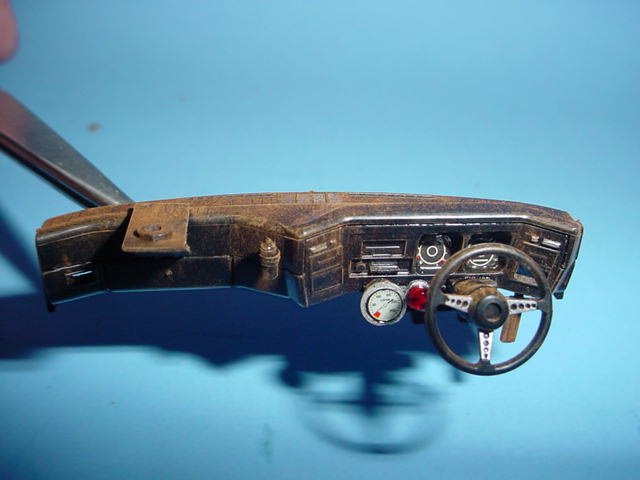
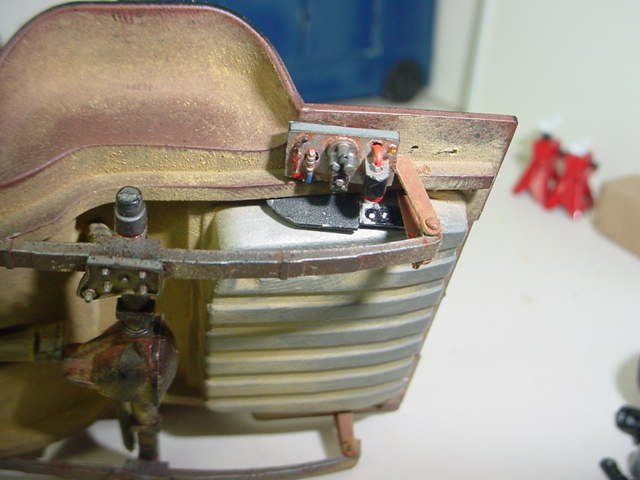
The dashboard was modified somewhat. I cut out the A/C vents first theorizing that these might have been discarded at some point. Aoshima thoughtfully included the mounting bracket for the revolving emergency light which is included but not used). I drilled out a hole to give the impression that this is where the light had once been. It was glued to the dashboard and detailed by dry-brushing the edges to show wear. I also added a couple of tiny dabs of silver with a toothpick, to simulate screws that would have been used to mount the bracket to the dashboard.
In the movie a coil can be seen mounted to the dashboard to the right of the light bracket. So I scrounged one from the parts box, and installed it in the center of the dash. I made a bracket from plastic angle, glued it to the bottom of the steering column, and mounted the fuel gauge and warning light. The dashboard instruments are represented by decals, and topped with Future to resemble the instrument lenses.
The lid of the console on the floor was also removed with a razor saw. A piece of plastic was cut and glued in from the bottom to represent the ôfloorö of the console area. While this area is not seen in the movie, I used a bit of creative license here, mainly so that I could include a couple of detail items in it.
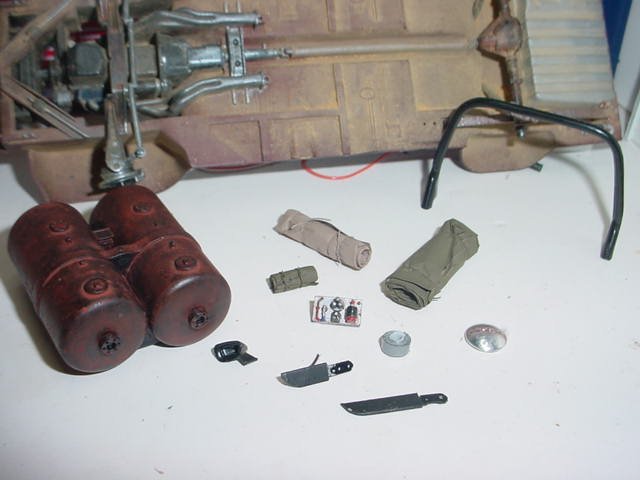
Ah, yes, the detail items. The STUFF! I wanted to recreate items to make the model familiar to those who have seen the movie. By scrutinizing the DVD, I made a list of things I could add. Things like bolt cutters, an air cleaner element, and a crowbar. A can of dog food (which is included in the kit, by the way), a fork, and a can opener. A modeling friend in Germany, Michael Winkler, also a member of MCU, supplied me with images of the cases of ôDinki Diö dog food. I printed them out on brown craft paper, to resemble cardboard, and glued them up using white glue.
Then I expanded the list a bit to include things that are not actually seen, but you can bet a man in Maxĺs situation would have them. Tools to change a tire, for instance, or a toolbox for the times he would have to repair or maintain his machine. A tarp in case he needed to have one as a blanket.
And then, I also added an item strictly as an act of whimsy - a roll of duct tape. I just couldnĺt resist!
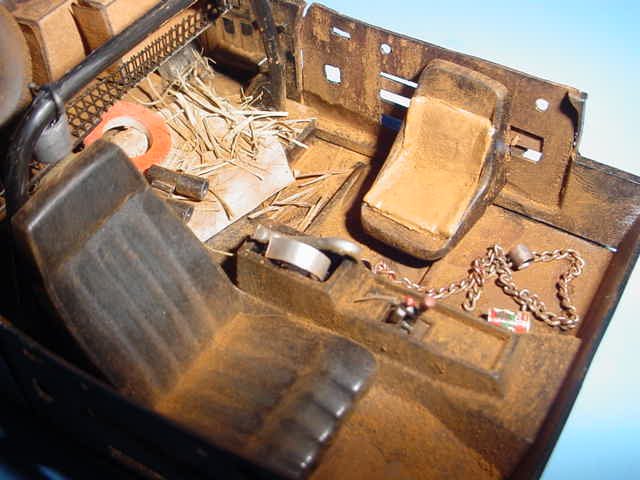
A blanket made from a tissue for cleaning glasses was cut, folded and draped over the rear shelf on the floor, and given a coating of water and white glue so that it would hold itĺs shape. It was painted a light tan, then grunged up a bit with some brown pastel powder to give it some age. I added straw to the floor of the car, as this is where the dog sleeps. The straw was made from grass clippings from my yard, held in place with clear flat paint. A tool box and tarp were placed behind Maxĺs seat, with the air cleaner element off to the rear of the compartment.
The roll bar came from the parts box. I added a small hook made from wire, and added the small pail to it. As in the movie, the pail in my model actually swings around, rather than being rigidly mounted in place.
The bolt cutters and cases of dog food were added to the upper shelf. A photoetched can opener was placed on the console, while a photoetched fork sits on the floor close to the empty dog food can. A chain and shackles, seen in the movie, were replicated with some chain and tubing, and placed on the floor of the car.
The dog seat was modified a little bit, in order to move it closer to the door panel, which was actually farther away from the center of the vehicle, since Iĺd modified it. All I had to do was trim the mounting brackets underneath it. The pad on the seat was made from some two-part epoxy putty.
With the ôstuffö in place, I assembled the interior. Then I broke out some pastel powders and gave everything inside a good dusting.
Before installing it, I had to modify the window unit.
The side windows were cut out, so as to give a better view of the detail inside the car. I masked off wiper marks on the windshield, and gave it a light dusting of a dark reddish-brown acrylic paint, Model Masters Burnt Sienna, with my airbrush. The header was painted flat black. I left out the ceiling console, as it was not in the ôRoad Warriorö version of the car. Then the glass was installed, followed up by the interior assembly.
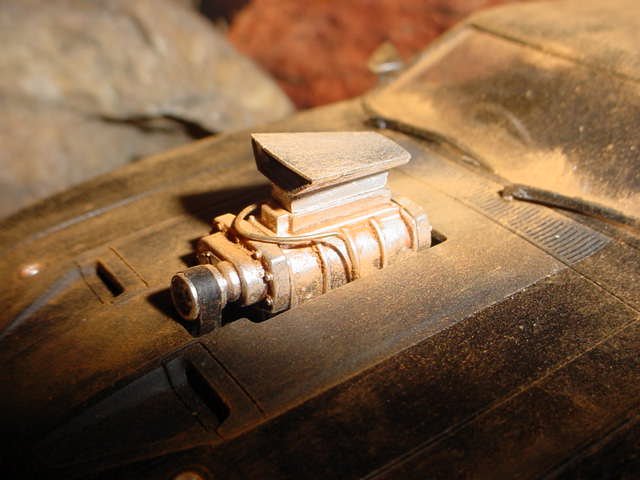
The blower assembly was detailed with a fuel line, then attached to the underside of the hood. The chassis was then slipped into place.
Although the primary of the weathering of the car would be done using pastel powders, I prepped a few parts, such as the blower and wheels, with Rustall. This would get down into the tiny crevices of the parts better than the powders would, plus provide a little bit of ôgrabö for the powder. I also carefully airbrushed the rear of the car with the Burnt Sienna. Now I was ready for weathering.
I began with the chassis. The powder I used is a reddish brown color, and looked perfect to represent the dirt seen in the Australian countryside where Max roamed. I started by gathering a brushful of dust, then tapping it on the edge of the container to release most of the powder from the bristles, then brushing it on. I worked from front to rear, where most of it accumulated on the leading edges of the various frame parts. This is the way it would be in full scale. I also made sure I got plenty in the wheel wells, where it would be thrown by the tires. Of course, I made sure I ground it into the wheels and tires well, too.
Setting the car on itĺs wheels, now I focused on the outside of the car. Using the DVD of the movie as a guide, I made sure I got it on the sides of the car, down the center of the hood, and all over the rear of the car. I also dusted down the rear of the fuel tanks and the spoilers on the car.
At last, I could call it done. I showed pictures of this car on a few internet modeling groups in addition to MCU, as well as on the Hobby Heaven Message board, and got many positive responses for it. I was very pleased, and very flattered. And Iĺd like to take this time to thank all of those who gave me kudos and encouragement, and in particular, Iĺd like to thank Dave Carnevale of the Hobby Heaven Message Board, and Chris Soefje and Michael Winkler, both of ModelCarsUnlimited.
Now that the Interceptor is done, I have a couple more plans for it. I acquired a resin figure of Max, and also have a resin dog that I will try to paint up to look like his faithful companion. Iĺll add a little groundwork to a base, then put it all into a display case so that it doesnĺt getů dirty. Go figureů